Thursday, July 28, 2016

Beef Jerky forever


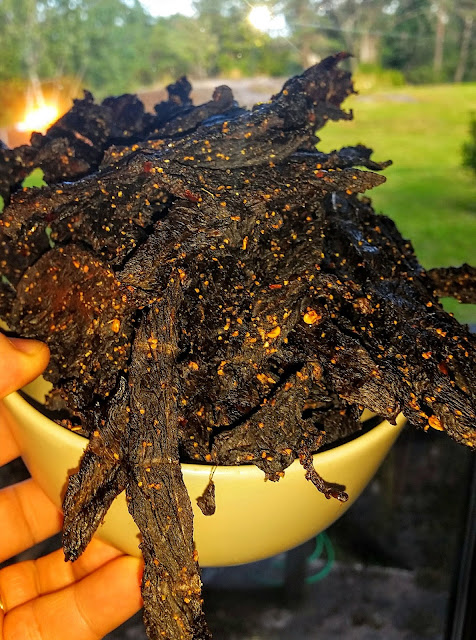
Had to make some more beef jerky.
My family and friends love this recipe. This time I used some nice sliced beef meat.
You can see my Wild boar jerky recipe. Exactly the same herbs and method this time but now with beef. Just wanted show some pictures here.

Pretty simple but so good !


Wednesday, July 27, 2016

Pyttipanna


A simple Swedish classic dish is Pyttipanna.
Generally meat left overs from the BBQ the other day and cooked potatoes.

In this case I used:
- wild boar ,beef and chicken breasts from yesterdays BBQ
- Cooked potatoes leftovers from some other dinner this week.
- Eggs

Start up a pan with butter and oil .
Cut the meat and potatoes into nice pieces as big as u like them to be.
Start fry it in the pan. Sprinkel it with some black pepper and salt or whatever u find good.
Add some extra butter and make sure u get a nice golden brown surface .

When ready fry some eggs and let the egg yolk be runny . Add the egg on top of the meat and potatoe mix and u have a very delicious dish to enjoy.

We usually add yellow onions and sausages in the dish also and top with some potted root beet.
Potted root beet is very good to this dish.

Good luck making your own Pyttipanna!


Monday, July 25, 2016

Beef Breasola project Finished


Time to try making some Beef Breasola.
4 days ago I started this short term project. Getting a piece of nice beef loin from the grocery store was the first step to start with. This piece weight about 1,5 kgs .
Clean the meat from any blood, fat and membranes etc.
Then time for the curing process.

For the cure I used:

Nitrite salt  0,7 dl
Black pepper 1/2 dl
Mixed pepper 1/2 dl
Mixed herbs/spices 0,5 dl
Garlic  Powder  2 table spoons
Smoked Paprika powder 2 table spoons

Now I let the meat cure in this mix . In a plastic bag for about 4 days in the refrigerator.
Now the meat will dry out because of the salt and get a lot of nice flavors from the spices and herbs.

After 4 days I take out the meat from the refrigerator. You now have a lot of liquid in the plastic bag and the meat feels much firmer/harder.
I now clean the meat with cold water and dry it in a clean towel. Then I tie up the meat with some cooking string to make a sausage kind of shape on it.  No need to I suppose but recipes say u should.

After that I add some new fresh crushed black pepper all over it and smoked paprika powder.

Now it should hang for about 3 weeks before ready to eat and loose about 30% of the weight.
I hang this piece next to my Prosciutto in the cellar room. About 23 degrees Celcius and 60% humidity right now.

I will let you know when I try it out and get back with some pictures.

Now after 3 weeks the meat is ready.

The result was just perfect. Nicely red and great taste.
This won´t be the last time I try this. 3 weeks is just long enough I think.


:


Friday, July 22, 2016

Smoked wild boar ham


Yesterday I smoked two wild boar hams. About 2-3 kgs each from a 40 kgs boar.

Started early in the morning and smoking for about 9 hours.
Preparing for the family gathering this weekend celebrating my son and wifes birthday with something good to eat. This is for sure food with some extra love in it .

I started the curing process 4 days earlier putting the ham in a curing bath containing 10% Nitrite salt 90% water.
Before I started the smoking I washed off the saltwater from the ham with cold tap water and dried it with a clean towel before hanging the meat in the smoker.
The first 6 hours teh Temperature was between 70-90 degrees celcius most of the time.
The last 3 hours higher Temperature between 90-120 . Stopping when the meat inner temperature reached 71 degrees celcius.

Used small apple wood chunks and alder wood chips as smoking material.
Also added some dried thyme herbs from the garden to add something extra to the flavors.

When ready I let the ham cool down wrapped in some aluminum foil for a few hours.
Then I cut the first test sample. Nice saltiness and smoke flavor. My wife liked the result. Good enough for me.

No need for panic start figuring out something else for the family gathering this weekend.
Proud serving this for sure.


Wednesday, July 13, 2016

Risotto wild boar and chanterelles


Tonight we had a great dinner!
What is better then and nice cheesy risotto and why not combine this with some tasty grilled wild boar meat and top it with some spicy fried chanterelles .

Wild boar meat

A few nice slices wild boar meat marinated for 24 hours with some mixed herbs , salt, olive oil, syrup, smoked liquid, black pepper and salt. Don´t follow any recipe. Changing from time to time with what feels right.

Chanterelles

Locally picked chanterelles fried with some butter, salt and black pepper until getting a nice dry crisp.

Risotto

The risotto might need to be described a little bit closer . This one is very tasty for sure.

Recipe for 8 persons.

The ingredients:

- Arbora rice 6 dl
- Yellow onion  1 big  fine cut
- Garlic  4-5 big cloves  pressed or fine cut
- White wine 4 dl
- Stock meat/vegetable  2 litres
- Salt  1 table spoon
- Black pepper  1 table spoon
- Parmesan 0,2 kgs fine cut
- Butter 0,1 kg
- Olive oil 1 dl
- Dried chanterelles 1 dl

Start up a stove plate on maximum heat. Then u add a pot with the olive oil. Heat up the oil and start fry the onion and garlic util u get a fine golden surface.
Now u can start adding the white wine, half of the stock and the rice. Also add the salt, pepper and the dried chanterelles.
When the mix starts to boil up u turn down the heat to almost half. Now it should cook slowly.
Make sure to turn around the risotto once in a while to avoid burn it in the bottom.
Normally the process takes about 30 minutes until ready.
During this time u add the remaining stock as soon as the risotto starts to get to dry. Should be
moist and creamy during the whole process.
You should for sure taste and add salt and pepper if more needed.
When the rice starts to get the fine final texture u like u should add the Parmesan and when ready to serv u add the butter.


Now u have a wonderful dish .
For sure u can add some fresh vegetables to it also.
And a nice glass of red wine . Can´t be much better.

Enjoy!


Tuesday, July 12, 2016

Project home made Escargot


Have picked and played with snails in the gardens since I was a kid.
I used to keep them in buckets and I learned early they were a real nice gourmet dish in France and some other places.

My parents served us the famous dish Escargot when I was young. I then thought it was disgusting to eat slimy snails. I loved the warm garlic butter where u dipped the bread in. It was delicious for sure.
My partens bought the ready prepared snails from the store , Pretty easy.
Me and my sister used to get false snails. Mushrooms u used instead of the snails but with the similar texture. Had no problems with the mushrooms.

When I got older and was out travelling I tried the real Escargot dish on some restaurants serving it.
If u like garlic and warm butter u love this dish for sure. Who can´t appreciate this dish.
Alright it´s the garlic taste u want . That´t for sure in my case though.

Anyway we have a lot of these Escargot snails crawling around in our garden. I have thought about it many times to do my own Escargot. Why not try when u have plenty of them in the garden.

Now I finally did it. I started the process . Not a quick fix but not so difficult if u take your time and follow the instructions.
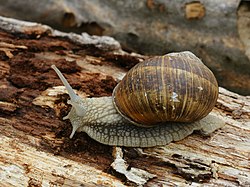
Helix pomatia (Dourbes).jpg
Finding the snails

This is the snail we use  Check the link.

A good start is to get some snails. The right kind of snails u can eat . Some can taste bad and some might be poison. Check with local expertis before picking any for safety reasons. The once I picked I believe is eatable though......


When u start looking for them u should preferably do it a day when it´s wet outside.
They love to crawl around after rain. Other sunny warmer days they hide to keep away from the heat.
I could have picked 100 big once easily the day I picked them. I ended up with about 30 snails.
Thought it was enough to start with when trying this for the first time.
They prefer leaf/grass composts where they can mate and lay their eggs. You often see plenty of them when u find the spot they like to hang around. But during rain u can find them all over the places.


Preparation time

When u have your snails u should do the preparation process. Not start cooking them directly.
Now u should make sure the snail gets rid of all the poo. Most people don´t like that.
There are different ways/ideas how this should be done. I did´it my way ....
I got a plastic bucket with some small holes in the bottom for water to run through.
Then I added a 4-5 cm clean gravel/stone layer like a filter. On top of the bucket I used some chicken wire I prepared as a lid and adding a little weight on top. Just making sure the wholes aren´t to big for the snail to crawl through with it´s shell.

Then I added the snail to the bucket.Not the most funny place to be fo rour snails. But it´s free from food. Now the poor creatures having a week with out any food. No grass or anything.
Now it´s the poo week . After a week they should be free from all the poo.
During this time I pour some water on them once in a while to give the some moist anyway.
I pour a lot of water. During this time u will see a lot of poo in the bucket. The water makes it a little cleaner and the dirty water runs through the holes in the bottom of the bucket. Keep the bucket outside where the water can run freely. Make sure it´s kept in a shady place also and avoid direct sunlight.
After a few days a lot of the snails starts to move inside their shell and creating a lid of slime hardening in the opening.  Nothing to worry about.

After this week it´s time to do some working .
When removing them from the bucket it´s time to clean them up a little before the next step.
Some cold water and a brush and try to remove any dirt and poo that might be stucked on the snail.
When clean and looking good it´s time for the next step.

Killing and slime removal time

Now it´s time for the killing and slime removal process.
For this process u fill a bucket with 2 litres of cold water , 1 dl vinegar and 10 table spoons salt.
Mix it around and u have the deadly mix ready.

Now u drop the snails in it. It will start boiling in the water when the water enters the snails shells and fill them up. This mix will kill the snails pretty quickly. They drop down to the bottom and won´t move at all. The mix will also remove all extra slime from the snails. You will soon see a lot of slime in the water and around the snails. If there is plenty of it u can remove some of the mix and fill up with more liquid. Now you shall let the snails stay in the mix for about 2 hours.
To make sure all slime possible is removed from the snails.
When ready u need to clean the snails again from any slime hanging on to them.
Then its´time for the next step.


Snail removal from the shell

Now it´s time to remove the snail from the shell. But before u do this u need to cook the snails for about 10 minutes. Fill a pot with some cold water . Enough to cover the snails. Then u add the snails.Now the snails should stay there until the water has boild for about 10 minutes.
Then u remove the pot and let the snails cold down a few minutes.
Ready now to remove the snail from the shell. Makes it easy if u have a small fork or a snailfork.
You grab the shell with one of your hands and work with the fork to remove the snail. A gentle twist movement makes it really easy to remove the snail. Don´t use to much force.
The result is a long thing that will curl back and look like a snail with a shell. Fantastic creature for sure. When u have done a few it´s pretty easy and fun to do.
You might think you should eat all that coming out from the shell. That is not correct.

Now it´s time for the next step. That is to remove the big part of the snail u aren´t suppose to eat.
It´s the big shell look a like part of the snail u just removed from the shell. This is the intestinal and the part gripping the shell .The part u should save is the small brownish remaining part. The part u can see when the snail is outside the shell and crawling. This is the only part u should save and eat.

Now u find out that there is only a little left from all the snails with shell u just had.

I had a lot of slime still attached to the snails. I had to have another cleaning process with a small sharp knife removing the slime leftovers. It was slippery and tricky but they ended up clean and nice.

Cooking time

Now the snails shall cook slowly for about 3 hours in a nice bath of goodies.
For this I used:

- Water 2 litres
- White wine 1 litre
- Garlic 6-7 cloves hacked in big chunks
- Parsnip 1 big hacked in big chunks
- Carrot 1 big hacked in big chunks
- Yellow Onion 1 big hacked in big chunks
- One bay leaf
- A handfull with  mixed fresh herbs from the garden
- Salt 3 table spoons
- Chilli flakes 1 table spoon ( Optional .Wanted some extra heat )


Now they shall be ready for the final Escargot process .
I freezed the snails in a little bucket when they had cold down.


In the next few weeks from now you should be prepared to see the interesting final result.
Crossing my fingers...


To be continued.......


Monday, July 11, 2016

Home made cheese & bacon burger


What can be better than a nice big juicy home made cheese and bacon burger....

For sure u can make all the details in it by yourself but the best with home made is that u can mix whatever u like in it. Buy whatever fresh ingredients u like to use.

Why not make your own hamburger. Much nicer than the thin dry once u find in the store. For six big juicy burgers we used 1 kg minced beef.
A lot of crushed black pepper , salt , garlic powder and a table spoon hickory smoke liquid.
You mix they way u like it. Might add some spice to it also but we didn´t this time.

Of course u finish them on the grill. Make sure u get a nice grilled color surface on them.
When u feel that u soon have to remove the burgers. Add a nice slice of cheddar cheese on top and let it melt. Put on the lid on the grill a short while and the cheese will melt nicely on top of the burger.
Now u have a cheese burger ready.
Just before adding the burgers on the grill the bread was grilled quickly to get a nice grilled finish.

Make sure u don´r overcook the burgers now. With the fresh nice beef u want it a little red and juicy in the middle. Make sure though u have meat u can do this with. If not u give it a few extra minutes.
Should taste good anyway.

During the time bacon slices was grilled in the oven until crispy and nice.

Now time to put together the package with ingredients.
For this burger I used.

- Slightly grilled bottom piece of the hamburger bread.
- A few slices yellow onion
- Tomato ketchup
- Original american hamburger dressing
- Sweet pickled cucumber slices
- Then the thick home made hamburger with melted cheddar cheese on top
- Hickory BBQ sauce
- A few slices of grilled bacon
- Finally the grilled top of the bread


Now u have a perfect burger to enjoy. Why not also add some nice cole slaw and frensh fries .
An icy cold Coke and u are home!


Sunday, July 3, 2016

Smoked roe deer


Today I helped my friend Magnus to smoke two roe deer tighs.
A nice roebuck he shot the last day of the roe buck hunting season a few weeks ago.

I got the meat last Tuesday.
Cleaning it from membranes before I put it in a 10% cold saltwater marinade for  4-5 days.
Water with 10% Nitrite salt mixed.
The saltwater mix penetrates the meat about 1 cm per day from each side. 4-5 days was enough for these pieces though.

This Sunday morning it was time to smoke it.
Washed the meat from saltwater and dried it for a little while before smoking it.
Lighted the smoker and added the meat when the temperature reached about 50 degrees celcius.
I started to smoke about 07:30 AM in the morning and ended about 03:00 PM in the afternoon.
About 7,5 hour in the smoker today.
I started with a pretty low temperature 50-70 degrees Celcius the first 2-3 hours. Then increasing to 80-100 degrees celcius the next 2-3 hours and ending with 100-120 degrees celcius .
I stopped smoking when the meat temperature in the thickest part reached 68 degrees celcius.

Very happy with the result. Nice saltiness and smoke flavor.
Think 10% salt mix is perfect .

Take care!


Friday, July 1, 2016

Paella Chicken and Chorizo


What is more tasty then my mothers Paella with chicken and chorizo . Can´t get enough of it .

Recipe for 8 people depending on how hungry u are. We are though  :


- Arborio rice ( Paella rice )  8 dl
- Chicken leg filé 1,5 kg
- Chorizo sausage strong 1kg
- Yellow onion  2 big
- Red paprika 2 big
- Garlic 5-6 cloves
- White wine 5 dl
- Chicken stock 2 litres
- Green peas 0,5 kg
- Cherry tomatoes canned 0,5 kg
- Black pepper 4 table spoons
- Chilli flakes medium hot 2 table spoons
- Saffron 0,5 grams 
- Paprika powder red  3 table spoons
- Olive oil 1 dl


First u need something to cook the Paella in. For this we used a Muurikka. A kind of big wok pan with a lid. You can use other big pans also for this.

First u start frying the chicken meat. 3-4 minutes in the pan. This is nice tender meat from the chicken legs until u get some nice color.
Then adding chopped onion, paprika, garlic and chorizo. You chop as big as u like it to be.
Fry it another few minutes with the black pepper, chili powder and paprika powder. Add the cherry tomatoes. Then the wine. U can mix the saffron in the wine as it needs to be mixed in liquid before added.
Now u start adding the Arborio rice and the Chicken stock and the rest of the wine.
You lift the lid and add chicken stock now and then during the process . The rice needs to cook for about 20 minutes until ready.Put the lid on the pan for the final cooking .
You add the green peas in the last few minutes of the cooking process.
The dish takes all in all about 30 minutes . It´s ready when the rice feels al dente and most liquid is gone and u have a good Paella texture.

Important to know is that u can do this dish in 1000 different ways. Only your imagine can put a stop to it. This recipe is good though.. If you have good quality seafood nearby u for sure should make a seafood Paella with all goodies it can bring to the dish.

Why not a nice wild boar Paella with some nice smoked bacon on top.


This is a dish we for sure need to do more often. So good !