Saturday, December 10, 2016

Wildboar summer sausage


Had to try making some sausage again.
Read a lot about a sausage called summer sausage. A pretty easy sausage to make it seemed to be and it looked very tasty also. Something between a Salami and Mortadella or Falukorv as we like a lot in Sweden.

This is what I used for above 2 big sausages.

- Wild boar meat 1,7 kgs   Ham and Loin parts in this case.(Other meat can be used also for sure )
- Pork lard  0,3 kgs
- Black pepper crushed  5 tsp
- Garlic powder  3 tsp
- Onion powder  3 tsp
- Mustard seeds yellow  3 tsp
- Mustard seeds yellow crushed 2 tsp
- Liquid smoke 5 tsp
- Water 4 dl
- Nitre salt 2-3 % based on the meat weight u use
- Sausage casing . In this case a red fiber skin . Dimension 69 mm , 600 mm long .
- Some cotton thread to tie up the sausage ends with

Now the fun starts when u have all the ingredients u need.
The meat u use should always be very cold or almost freezed when u work with it.
Also the equipment used as it helps keep the cold during the process.

I started to make the spice slury first. Mixing all the pepper, garlic, onion , mustard , salt , water and liquid smoke in a bowl and mixed it well .

Next step I started to cut up the meat and lard in nice smaller chunks that fitted in the grinder.
Then grind it well. I used the smallest holes . When the meat is grinded it should be very fine  .

Now I mix the minced meat with the spice slury. make sure it´s mixed well .
This will be a very fine paste now. I used my washed hands with some Vinyl gloves on.
Can also use a big wood spoon or similar. Just takes a few minutes .

Then it´s time to fill the sausage casings. I can grind the meat and fill the casing with the machine I have. In this case I think u could also fill the casings with your hands or spoon directly as the big dimension if u don´t have the equipment. Make sure u pack the casing well. U don´t want air pockets if u can avoid them.

When the casings are filled you tie the ends. You then take a clean needle and pick small holes where u find air pockets as they should be removed if possible,

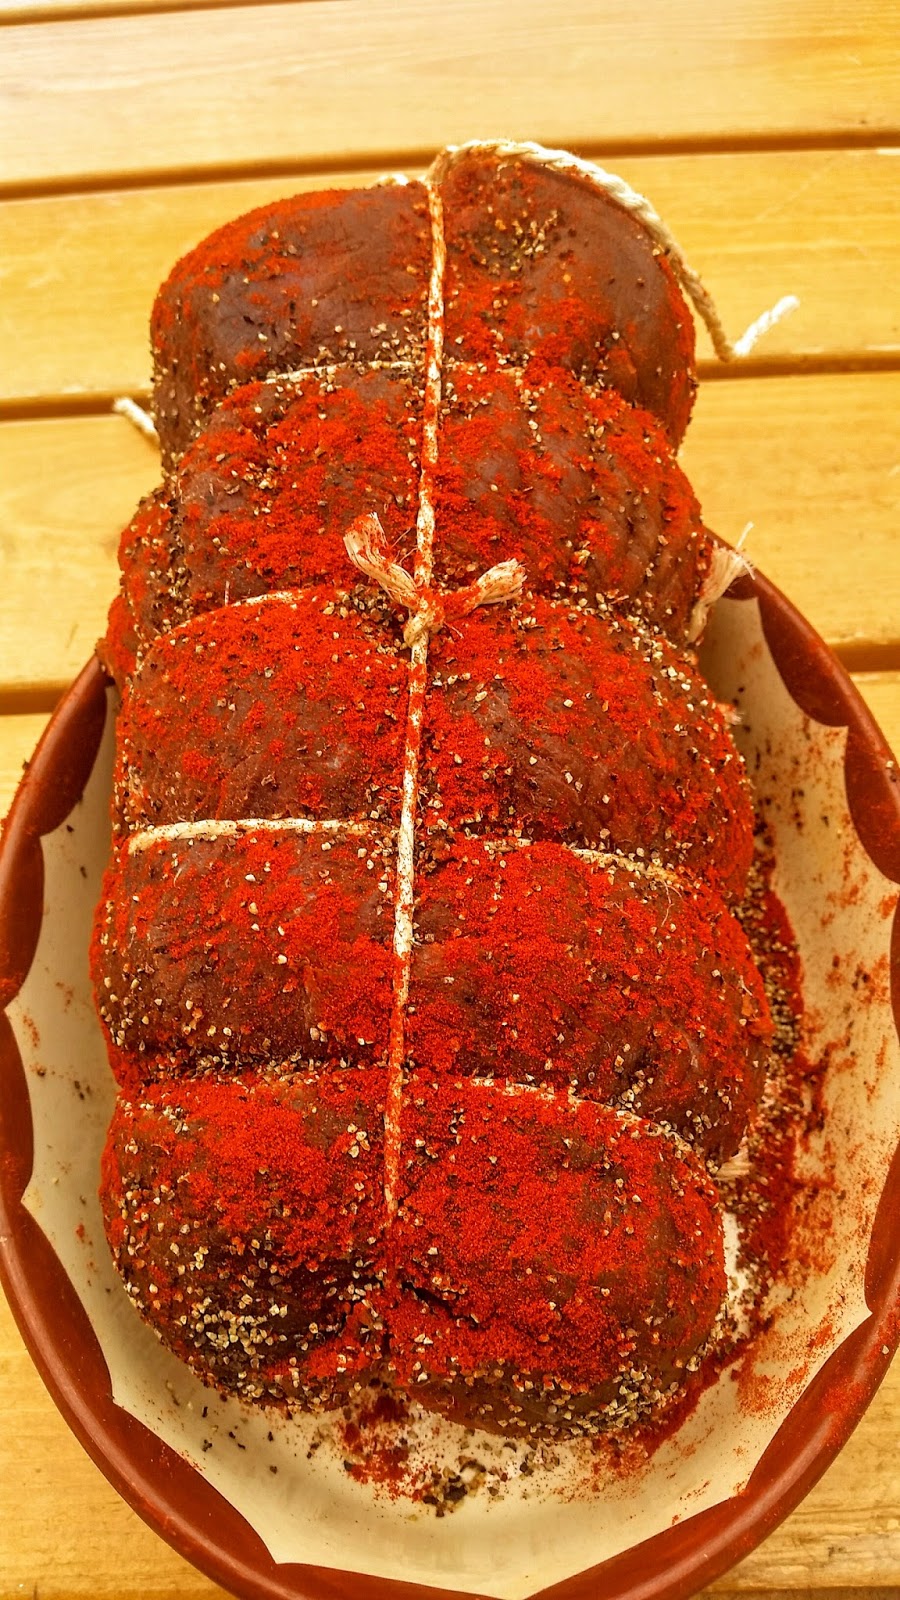
I cleaned the sausages in cold water and dried them off with a clean towel before I put them in the refrigerator over night for some needed curing time before the next step.

The next afternoon about 24 hours later it was time put them in the oven for the final stage.
The oven temperature was set on 80 degrees Celcius.
When the sausage inner temperature reach 70 degrees Celcius it should be ready.
For me it took about 4,5 hours. U need to make sure u have a good control over the temperatures.
The oven and the sausage temperature. The first hour I had a small opening in the oven to let out moist . Then it was closed for the rest of the time.

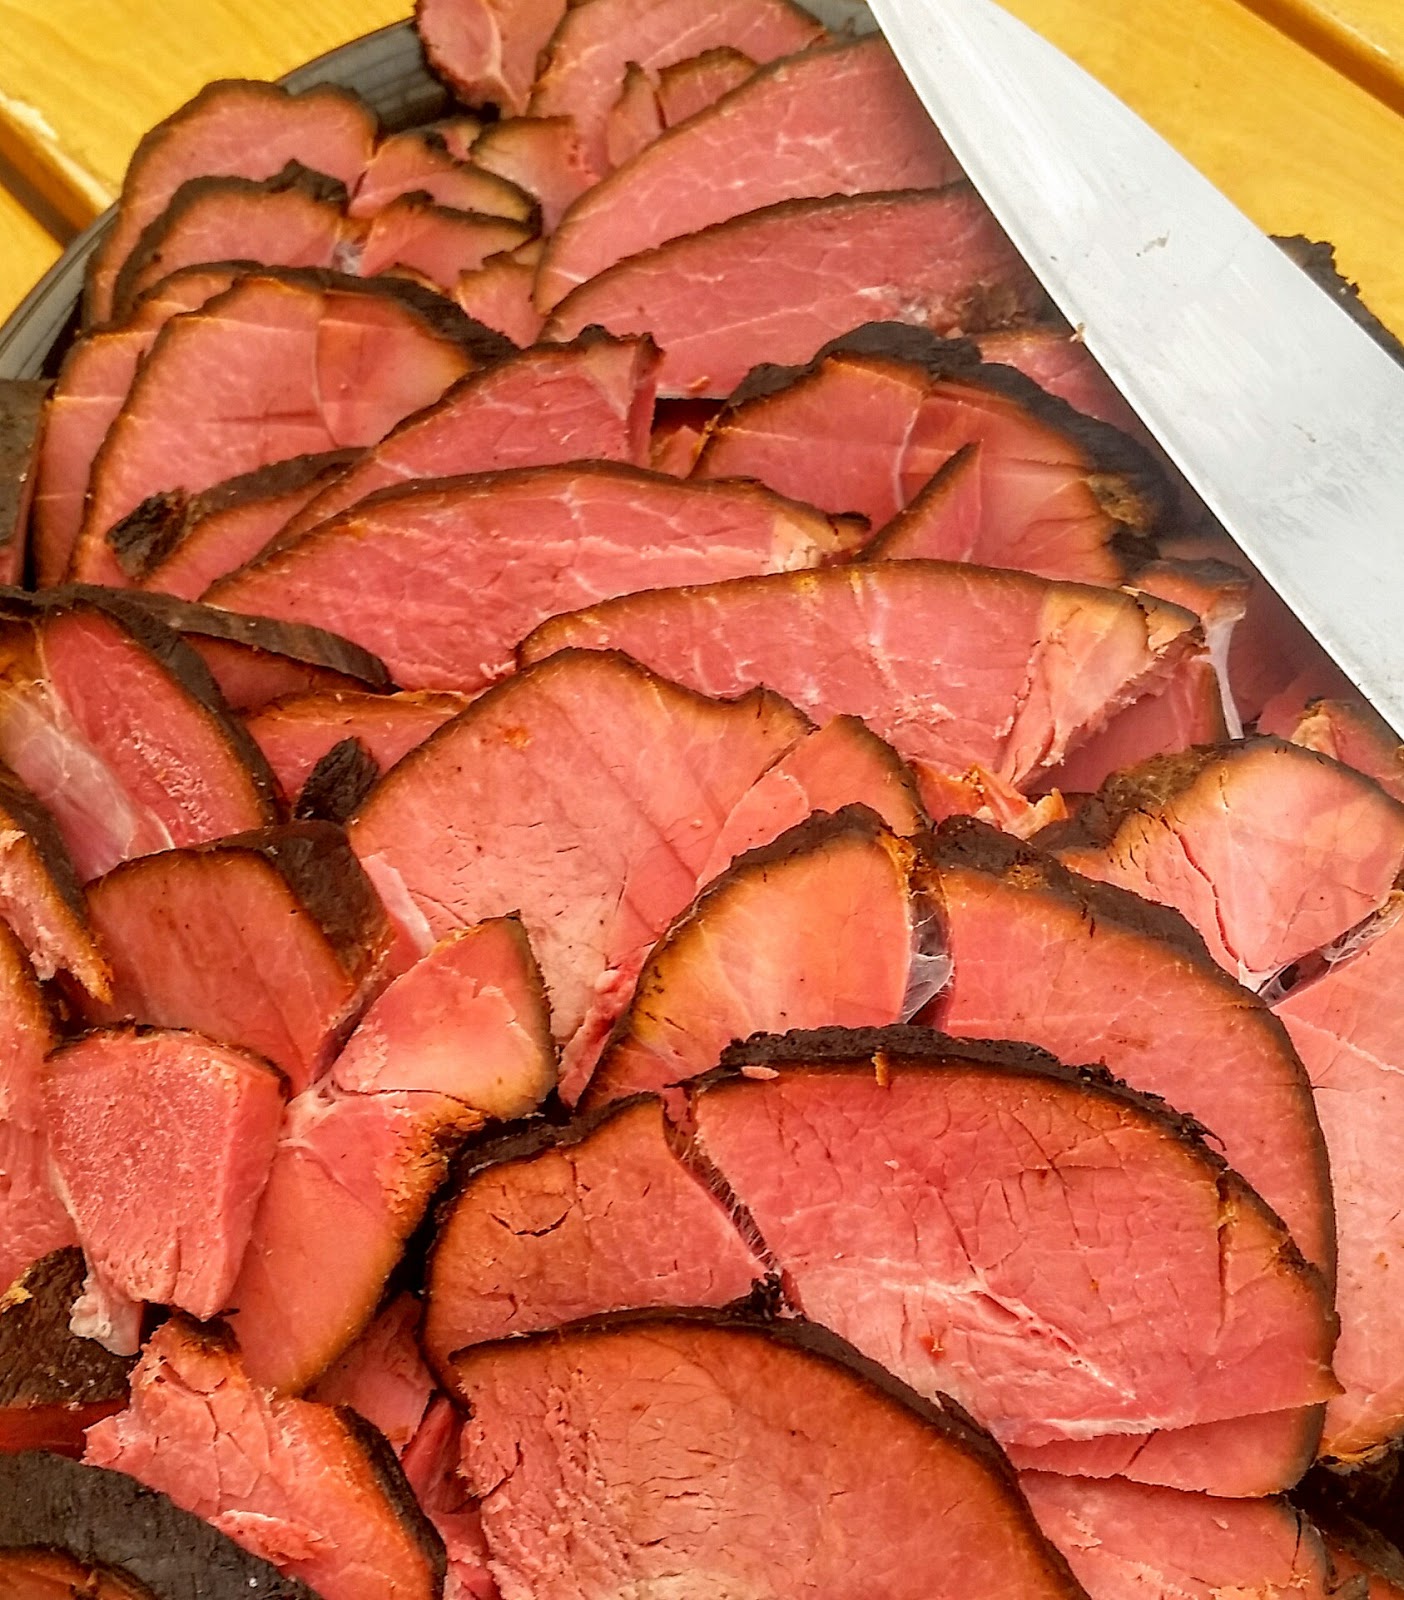
As soon as the sausage inner temperature reached 70 degrees celicius it was time to remove it from the oven. It also has to be chilled down quickly they say so I did.
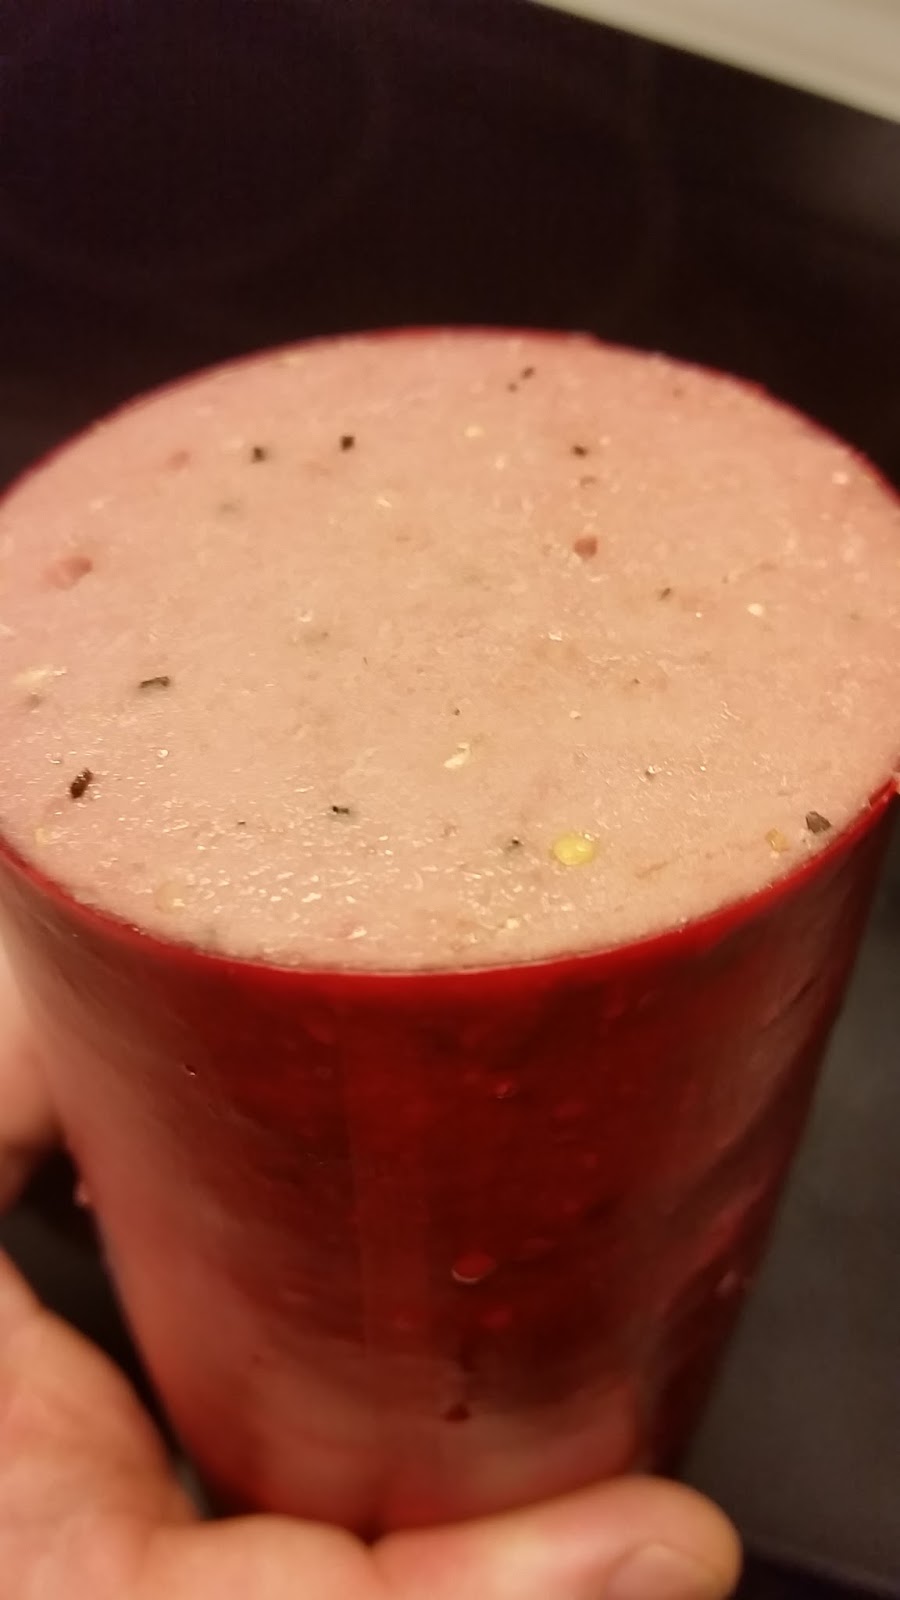
I put it under cold water for a few minutes. Then a a little later when it had cold down enough it was put in the refrigerator again over night. When chilled down it was ready to be enjoyed.
I had to taste short after the remove from the oven and it was very good and tasty warm also.

This sausage is called summer sausage as they used to make this historically to last a few month over the summer season. A sausage farmers and wood workers brought with them when they were out on the fields or in the woods working.

A perfect sausage for the active people today out in the nature.
Any meat can be used for this but the temperatures can vary a little depending on what type of meat.

You can for sure also avoid the liquid smoke and oven and hang it in a smoker instead if u have it.
This worked perfect though and it tasted just wonderful.


Good luck trying!


Monday, December 5, 2016

Lamb Pancetta


Time to try some Lamb pancetta .

A nice piece of Lamb thigh have been cured a few days in a 8% salt bath.
Then covered with spieces, packed in a meat net and now hanging for a few weeks.

I used Garlic, Black pepper and Ginger this time. Tastes I like and believe in.
In about 4-5 weeks from now I will give it a try.

I will get back about the result and some pictures when the meat is sliced and ready to be enjoyed.


Saturday, November 26, 2016

Cured pork tenderloin - Lonzino -


Cured and spiced meat is so good!

This one should also be pretty easy to make so why not test it.
They call it Lonzino in Italy. Cured pork tenderloin. Takes only 10-14 days until ready.

After trimming the tenderloin I give it a 2 day 8% Nitrite salt bath .
Depending on how thick the meat is but for this enough with 2 days.

After the bath I wash the meat in cold water a few seconds to remove salt from the outside of the meat. Then dry it with a clean towel . Then it´s time for the spieces.

I had 2 tenderloins and why not try with different spices . One for each.

The first:

- Black pepper crushed ( The Main spice on this one )
- Garlic Powder
- Yellow onion powder
- Red paprika powder
- Parsley powder

The second:

- Smoked red paprika powder ( The Main spice on this one )
- Cumin powder
- Nutmeg powder
- Ginger powder
- Sage powder


Make sure to rub in and cover the meat with the spieces.
You use as much as u like and the spice variation to be used must be endless.

Now it´s time to hang the meat for 10-14 days in my cellar room.
+23 C Humidity 50% can vary a little.

In a few days from now I will have a first taste and I will let u know what I think about the result.
I will also add some new pictures then showing it sliced and ready to be enjoyed.

You can for sure use what ever pork tenderloin u have available.


Worth trying !


Friday, November 25, 2016

Wild boar spare ribs roll


Had to test something new with some wild boar spare ribs.
Why not remove the bones and make some kind of roll with some tasty stuffing for a change.

What kind of stuffing should I use?
For sure something I like to eat. Something that might be good to mix together.

Cheese ! I like some creamy cheese . Who doesn´t ?  That´s the main ingredient except the meat then.
Some kind of cheese everybody in the family is okay with.
I choosed a ready mix with Cheddar and Mozzarella . Can´t be wrong.

Then u like to have some other good flavors that pops in your mouth and gives u another dimension. Only cheese is to boring . I made a small piece with only cheese though for my youngest . Nice daddy.
I thought Caper might be nice. Spread it all over. Could have used more though. 

Then some Anchovies to give a nice tasty saltiness.

That´s enough I thought. Very easy to over do things .I know. 
Could have added something strong and spicy also. Was thinking about adding some Jalapeno also.
Next time maybe.

What did I use:

- Wild boar spare ribs from one small pig 50 kgs . What ever spare ribs u have in place might do.
- Cheese 500 grams  mixed Cheddar and Mozzarella . What ever u like.
- Caper as much as u like. Look at the picture. Could have used some more.
- Anchovies 80 grams . Look at the picture. Could have used some more. 
- Salt
- Black pepper
- Garlic powder
- Egg  one
- Bread crumbles
- Butter salty  200 grams
- Olive oil 1/2 dl
- Cotton twine 

How did I make this roll?

First I covered the meat with salt, pepper and garlic powder as much as I felt was enough.
After that I covered the meat with a thick cheese layer. Adding the Caper and Anchovies on top.

Then it was time to make roll without all yummies falling out. I tied the rolls with some Cotton twine.
You can see the picture. 

Next step was to whisk an egg . Brush the meat rolls with the egg and cover it with bread crumbles.
Adding butter and oil in a frying pan and heat it up until it stops bubble.
Then hot enough and ready for some frying. Now I fry the meat on all sides until it gets a nice golden brown crunchy surface. Adding melt butter on top of the meat from the frying pan with a spoon while frying. Now it was ready to be finished in the oven. Temperature set at 200 degrees Celcius.
After about 1 hour in the oven the meat inner temperature reached + 80 degrees Celcius and was ready. 

It tasted great and everybody in the family liked it. 
Have to try it again some day.


To this I served French fries / Chips and a nice tomato/red onion sallad with Balsamic vinegar.
A glass red wine for the adults.
No more no less. Nice!


Monday, November 7, 2016

A good hunting week to remember


This was a very good and successful hunting week in October.

The week started with 3 nice days vacation in the woods hunting for moose with my hunting team.
The first day we shot a moose calf in the last minute before dark .

The second day and the hunting was soon to be stopped for the day.
I´m sitting and waiting close by a lake on a small hill far out in the woods with a good view over the lake with a nice opening below . I could imagine how the animals could and should run through there .
It was late and now I started to get a little bit cold and tiered and wanted to get home .
I could hear the hunting dog far a way on the other side of the lake . On the radio they said the dog most likely had found some wild boars and was barking at them.
It was far away and maybe hopefully they might get here but not for a while though.
But from nowhere I started to hear the branches breaking in the woods very close by. It was for sure something big closing in fast . I felt the heart starting to beat faster. Getting ready lifting up my rifle .
A few seconds later a big moose enters the opening below the hill where I´m sitting. Only 10-15 meters away from where I sit. I see this big beautiful majestic animal thinking. Is it alone or is there any calf following this moose cow.
We were allowed to shoot cows that were alone but u can never now that if u only have the animal visible for a few seconds in the opening running through.
But there it was . A calf was following the cow and this animal was allowed. As soon as it entered the opening from the right the shot was taken. Both animals stopped and turned around . I hit the calf but it didn´t fall directly. As soon the calf was in a good position the second shot made it fall to the ground.  It was a beautiful animal and u always feel humble afterwards.

3 days hunting for moose was a lot of hunting and it should for sure been enough for most people. But I could see that the wild boars had started to come to my feeding place in the wood.
I had not been lucky with the boars for a very long time now and felt I needed to give it a try.
Thursday evening I get out around 19:00 in the evening. It´s getting dark out there.
After sitting just one hour it comes. Straight out in the opening . It starts eating and don´t notice me sitting only 15 meters away from it.
I lift my rifle and aim. it stays still and I shoot. The pig falls down on the ground where it stays.
2 hours later the pig hangs ready in my garage gutted and the fur removed.
It was a very smooth and fast hunt .

The freezer is now filled with the best possible meet u can ever imagine.
A very good hunting week to remember.

Thanks a lot Diana !


Hunters pork


This is a very simple good dish to make.
It´s called Hunters pork . A nice piece of pork u can bring to the wilderness when hunting or doing some other activities and need some extra good energy and kill any hunger. You don´t need much.

What u need is this:

- A nice piece of salted belly pork
- Cinnamon
- BBQ seasoning

Cover the belly pork with Cinnamon and BBQ seasoning. Be a little careful with the cinnamon though. Put it in the oven at 80-90 degrees Celsius for 8-10 hours.


Now you should have something very tasty to enjoy warm or cold.
For sure u can try other spieces also depending on what u like.  This one works for all the family members.

Good luck!


Monday, October 3, 2016

Golden Jalapeno cheese balls - Gluten and Lactose free recipe -


Why not make an extra treat for the BBQ dish or just enjoy anyway. Dangerously good !
Fried spicy Jalapeno cheese balls.

Recipe for 15 balls

- Jalapeno hot   Fine cut 1 tea spoon per ball or how strong u like it to be
- Cheddar cheese   15 Cheddar slices. Ready packed .
- Water  1 dl
- Flour  1,5 dl
- Fibre husk  1 table spoon
- Salt  2 tea spoon
- Egg white   From one egg
- Butter 2 table spoons melted

- Rapeseed oil, corn or olive oil to deep fry in depending what u like


I started to make the cheese balls.
Add one tea spoon fine hacked hot Jalapeno to one slice cheese. Now u bake it to a nice firm ball.
Do this until all balls are ready.

Next step is to have the batter to cover the cheese balls with.
Whisk the egg white separately until fluffy
Mix the fibre husk with tepid water and let be for a few minutes.
Melt the butter. Then u mix all the ingredients together in a bowl.
You should get a thick creamy batter. Now it´s ready to be used.

Start heat up the oil . Might take a few minutes to cook up.

Now you dip the cheese balls in the batter and make sure it´s covered all around.
When ready with all the balls the oil should be hot enough for deep frying. You know the oil is ready if u dip a small stick or something in it and it starts bubble and cook around it.

Now the fun starts. It´s time to fry the balls. Just make sure to be careful and never throw any water on the oil if a fire starts or u get scared of the intensive cooking.

Don´t fry all the balls at the same time. Just a few at the time. Make sure the balls don´t get stuck during the frying. When removed it will break and the cheese will float out in the oil and the ball will be destroyed .You might need a few tests before u find a smooth way to do it.
It only takes a few minutes . The balls should get a nice golden color .
Now u should have some nice golden nuggets to enjoy. You should eat them shortly after when they are creamy and warm.When cold the cheese hardens but still good though.

Dangerously delicious !!


Thursday, September 29, 2016

Chanterelle butter


We use to make garlic butter sometimes for the BBQ meat. Very nice indeed.
Found a lot of Chanterelles this autumn so why not try to do some Chanterelle butter.

The mushrooms are tasty as they are when having them fried with the meat or in a nice sauce.
Why not in some nice butter and having it melt on top of the juicy tender steak or on the fries.

This is the recipe for this butter: 

- Chanterelles  A big pan filled ( Or others u like )
- Yellow Onion  1 big 
- Garlic  2 cloves
- Black pepper  A table spoon
- Salt  A table spoon
- Butter salty  1 kg

You start frying the mushrooms in a big pan together with some butter , the nicely cut onion ,garlic, salt and pepper until most moist gone and y have a nice fried surface. Not burned though.

Then u let the mix cool down and start cutting it until u have the size u like it to have.
Now you start mixing it with the butter. Make sure u mix it well .

Now it´s time to make sausages of the butter mix.. I formed the sausages in plastic foil. Then it was ready and put into the freezer.

For the next BBQ I can bring it out and cut the slices I want. Making my food drown in flood of tasty buttery chanterelle aromas with a touch of garlic.


Can`t be much better then this !


Sunday, September 11, 2016

Salsicca home made


Made some Salsicca this weekend.
What is more delicious and also pretty simple to make.
I made it with 2 different flavors/seasonings .

This is the recipe for about 22-25 of these hand size sausages :

The base :
Pork lean meat  1500 gr
Pig lard 500 gr
Salt 35 gr
White wine or water 1 dl
Black pepper crushed 6 gr

Pig casing 5 meters should be enough
You also need some equipment to be able to stuff the casings in a good way.

Seasoning 1:
Fennel crushed 4 gr

Seasoning 2:
Garlic powder or fresh crushed  3 gr
Salve powder or fresh crushed 3 gr


Day 1.
Prepare though is a good thing to remember when making sausage.
I started to cut the meat and lard one day ahead in small nice chunks easy to add in the grinder.
I put it in the freezer over night as u need cold meat and equipment to work with.

I also added the grinder parts that should be in contact with the meat to the freezer overnight.
Just make sure u have some extra space there. I had to make some space this time.

If you have the casing in the freezer make sure to remove it from there.
You can put it a bowl with water over night.

Day 2. Making day

1-2 hours before you want to start making the sausages u remove the meat from the freezer.
Doesn´t need to be rock hard cold. Need to be able to work with also.

You should also make sure to run water a few times through the casing before using it.
Do this in good time.

Start meassuring the seasoning and add it in 2 bowls if u like to try 2 different flavors like me.
If not u should double the seasoning as the meassures above are for the total meat volume.

Now it´s getting time to get started with the fun job making the sausage sort of speak.

Start adding the salt on the meat. Then it´s time to mix it in the grinder. Use the bigger holes 4-5 mm.
When the meat is grinded u split it in two halves and 2 different bowles.
Add the seasonings and make sure to mix it well with your hands or a blender. I used my hands and it was very cold but it worked.

Start adding the casing to the sausage equipment. Now it´s time to start filling the casings. This is the
fun part of making sausage when it works out and the casing is good quality.

The sausage length can for sure differ depending on how u like it to be. In this case to get 22-25 sausages u need to make them about 10 cms in length.
Make sure to make a knot in the end of the casing to make sure the meat stays in the casing.
Then u twist the sausage a few rounds when u have the desired length . The next sausage you twist the opposite way and keep on this until no more casing. You end for sure with another knot.

Difficult to explain the technique. You need to try and make mistakes also to be able to learn.
I did this myself but it´s better if somebody can help assisting during the sausage final process.

Now the sausage is ready .
Both seasonings are great but the fennel sausage is just wonderful when grilling it.


I hope u enjoy it !


Chanterelles & Porcino Heaven


The mushroom season is here in Sweden.
Finding a lot of delicious mushrooms right now when walking in the woods.
Chanterelles and Porcinos are some of the most delicious u can find out there.

It´s lovely to serve with other food or in sauces but why not enjoy only the mushrooms as they are. Feel the wonderful taste and aroma in a nice concentrated way.

The best way to do this is to fry the mushrooms with some nice salty butter and a little bit of pepper.
When the moist from the mushrooms have steamed away and the mushrooms getting a nice brown goldish color they are ready to be enjoyed. Just eating them as they are is lovely but putting them on a piece of nice bread with a lot of butter is the perfect way I think.

If the butter starts dripping down your hands and mouth when u eat this.
Then u know u are in heaven.


Chanterelles for keeping


It´s a great year for mushrooms in Sweden and top season right now for it.
The temperature is getting a little bit colder and it´s really nice having a long walk in the woods.

There is a lot of different mushrooms all over right now but if you aren´t an expert you should for sure be careful what u pick as some can be really sneaky and you can easily get really sick or in worst case die eating them or preparing them incorrect.
I have learned over the years a few mushrooms I dare to pick. The mushroom most Swedes feels sure about to pick is the Chanterelle. There are few different kinds but they are pretty easy to learn to recognize and it´s for sure one of the most tasty to eat so that´s for sure very good.

As we find so much Chanterelles this year we thought it would be good to dry some also.
As I have a machine for this why not use it . I usually only dry beef jerky in it .
One year I dried the mushrooms on some trays for a few weeks so u really don´t need any machines.

This machine dried the mushrooms after about 10 hours at 70 degrees Celcius. You want them to be really crispy . Then u know they are ready.

Now we could fill up some glass jars with rubber sealings making sure to avoid any moist.
The dried mushrooms can now be stored for years without any problems. Keep them in a dark
room though or cabinet.

Now u have the most delicious seasoning for sauces. Take some and mix down in the sauce.
Have some in the stew or casserole. If u haven´t crushed the mushrooms u can add them in water and they will pretty much get back to the origin texture before drying them.


If u like the Chanterelle flavor the possibilities are endless here.


Thursday, August 4, 2016

Pink Wildboar Dreams


Had to try something new with my wild boar meat.
Just picked the red Goose berries from the garden. Know that Goose berries are perfect for fat fish, duck and pork. Why not make a nice Goose berry sauce next time when grilling the wildboar meat.

There are a lot of recipes for Goose berry sauce out there. Checked around and found one I believed in and wanted to try.

This is the recipe for Goose berry sauce. Didn´t have any measures to follow and had to improvise a little but I was happy with the result though.

U don´t need that much sauce just enough to sprinkle on the food . This recipe is enough for 6-8 people at least.

- Goose berries 1 litre  ( red berries in this case )
- Yellow Onions 2 big
- 0,5 kg butter
- Star anise  2 stars
- Salt
- Black pepper
- Water 0,1 litres
- Meat stock 0,2 litres
- Sugar 0,1 litres

Start to clean, top and tail the Goose berries. Put them into a pan with a splash of water with the star anise. Cook over a low heat into they break down to a creamy pulp.

Besides that u prepare the stock. You can also use chicken or vegetable stock as u prefer it.

You also chop ans sauté the onions in butter until soft and translucent.
Now adding the stock and let it cook for another 10-15 minutes on low heat.
Don´t want to burn anything.

When ready u strain the onions in a another pan . Then strain the Goose berries in the same pan.
Add a little salt, pepper and the sugar. Taste and add some more if needed.
Finally cook up on a low heat and add some corn flour to make the sauce thicken.
Make sure to stir to avoid burning and or to thick sauce. I like it smooth and creamy like a nice Bearnaise sauce. I end adding some extra butter in the sauce. Can never be to much....

Hopefully u result in a beautiful pink red almost dangerous looking sauce.
A little bit of sour taste from the Goose berries but with a nice buttery onion taste in the background.
The sourness is nice to fat meat.

This time I used some ham and file from wild hog. The meat I spiced with salt and black pepper only.
The ham I cut open and filled with a lot of Gorgonzola cheese and white Asparagus.
Closed the meat and covered it with bacon . Used wooden tooth picks to make sure it held together.

The files I opened and filled with Cheddar Cheese and white asparagus and covered with bacon also.
Because I know some of the younger kids prefer this milder cheese taste.

While grilling the meat we prepared potato cloves in the oven with herbs and oil.
We also made a nice Mozzarella salad with sliced red onions, cherry tomatoes and Balsamic vinegar, salt and pepper.

Finally we ended up with a superb dinner.


Thursday, July 28, 2016

Beef Jerky forever


Had to make some more beef jerky.
My family and friends love this recipe. This time I used some nice sliced beef meat.
You can see my Wild boar jerky recipe. Exactly the same herbs and method this time but now with beef. Just wanted show some pictures here.

Pretty simple but so good !


Wednesday, July 27, 2016

Pyttipanna


A simple Swedish classic dish is Pyttipanna.
Generally meat left overs from the BBQ the other day and cooked potatoes.

In this case I used:
- wild boar ,beef and chicken breasts from yesterdays BBQ
- Cooked potatoes leftovers from some other dinner this week.
- Eggs

Start up a pan with butter and oil .
Cut the meat and potatoes into nice pieces as big as u like them to be.
Start fry it in the pan. Sprinkel it with some black pepper and salt or whatever u find good.
Add some extra butter and make sure u get a nice golden brown surface .

When ready fry some eggs and let the egg yolk be runny . Add the egg on top of the meat and potatoe mix and u have a very delicious dish to enjoy.

We usually add yellow onions and sausages in the dish also and top with some potted root beet.
Potted root beet is very good to this dish.

Good luck making your own Pyttipanna!


Monday, July 25, 2016

Beef Breasola project Finished


Time to try making some Beef Breasola.
4 days ago I started this short term project. Getting a piece of nice beef loin from the grocery store was the first step to start with. This piece weight about 1,5 kgs .
Clean the meat from any blood, fat and membranes etc.
Then time for the curing process.

For the cure I used:

Nitrite salt  0,7 dl
Black pepper 1/2 dl
Mixed pepper 1/2 dl
Mixed herbs/spices 0,5 dl
Garlic  Powder  2 table spoons
Smoked Paprika powder 2 table spoons

Now I let the meat cure in this mix . In a plastic bag for about 4 days in the refrigerator.
Now the meat will dry out because of the salt and get a lot of nice flavors from the spices and herbs.

After 4 days I take out the meat from the refrigerator. You now have a lot of liquid in the plastic bag and the meat feels much firmer/harder.
I now clean the meat with cold water and dry it in a clean towel. Then I tie up the meat with some cooking string to make a sausage kind of shape on it.  No need to I suppose but recipes say u should.

After that I add some new fresh crushed black pepper all over it and smoked paprika powder.

Now it should hang for about 3 weeks before ready to eat and loose about 30% of the weight.
I hang this piece next to my Prosciutto in the cellar room. About 23 degrees Celcius and 60% humidity right now.

I will let you know when I try it out and get back with some pictures.

Now after 3 weeks the meat is ready.

The result was just perfect. Nicely red and great taste.
This won´t be the last time I try this. 3 weeks is just long enough I think.


:


Friday, July 22, 2016

Smoked wild boar ham


Yesterday I smoked two wild boar hams. About 2-3 kgs each from a 40 kgs boar.

Started early in the morning and smoking for about 9 hours.
Preparing for the family gathering this weekend celebrating my son and wifes birthday with something good to eat. This is for sure food with some extra love in it .

I started the curing process 4 days earlier putting the ham in a curing bath containing 10% Nitrite salt 90% water.
Before I started the smoking I washed off the saltwater from the ham with cold tap water and dried it with a clean towel before hanging the meat in the smoker.
The first 6 hours teh Temperature was between 70-90 degrees celcius most of the time.
The last 3 hours higher Temperature between 90-120 . Stopping when the meat inner temperature reached 71 degrees celcius.

Used small apple wood chunks and alder wood chips as smoking material.
Also added some dried thyme herbs from the garden to add something extra to the flavors.

When ready I let the ham cool down wrapped in some aluminum foil for a few hours.
Then I cut the first test sample. Nice saltiness and smoke flavor. My wife liked the result. Good enough for me.

No need for panic start figuring out something else for the family gathering this weekend.
Proud serving this for sure.