


Have picked and played with snails in the gardens since I was a kid.
I used to keep them in buckets and I learned early they were a real nice gourmet dish in France and some other places.
My parents served us the famous dish Escargot when I was young. I then thought it was disgusting to eat slimy snails. I loved the warm garlic butter where u dipped the bread in. It was delicious for sure.
My partens bought the ready prepared snails from the store , Pretty easy.
Me and my sister used to get false snails. Mushrooms u used instead of the snails but with the similar texture. Had no problems with the mushrooms.
When I got older and was out travelling I tried the real Escargot dish on some restaurants serving it.
If u like garlic and warm butter u love this dish for sure. Who can´t appreciate this dish.
Alright it´s the garlic taste u want . That´t for sure in my case though.
Anyway we have a lot of these Escargot snails crawling around in our garden. I have thought about it many times to do my own Escargot. Why not try when u have plenty of them in the garden.
Now I finally did it. I started the process . Not a quick fix but not so difficult if u take your time and follow the instructions.
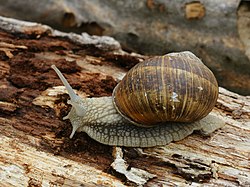
Finding the snails
This is the snail we use Check the link.
A good start is to get some snails. The right kind of snails u can eat . Some can taste bad and some might be poison. Check with local expertis before picking any for safety reasons. The once I picked I believe is eatable though......
When u start looking for them u should preferably do it a day when it´s wet outside.
They love to crawl around after rain. Other sunny warmer days they hide to keep away from the heat.
I could have picked 100 big once easily the day I picked them. I ended up with about 30 snails.
Thought it was enough to start with when trying this for the first time.
They prefer leaf/grass composts where they can mate and lay their eggs. You often see plenty of them when u find the spot they like to hang around. But during rain u can find them all over the places.
Preparation time
When u have your snails u should do the preparation process. Not start cooking them directly.
Now u should make sure the snail gets rid of all the poo. Most people don´t like that.
There are different ways/ideas how this should be done. I did´it my way ....
I got a plastic bucket with some small holes in the bottom for water to run through.
Then I added a 4-5 cm clean gravel/stone layer like a filter. On top of the bucket I used some chicken wire I prepared as a lid and adding a little weight on top. Just making sure the wholes aren´t to big for the snail to crawl through with it´s shell.
Then I added the snail to the bucket.Not the most funny place to be fo rour snails. But it´s free from food. Now the poor creatures having a week with out any food. No grass or anything.
Now it´s the poo week . After a week they should be free from all the poo.
During this time I pour some water on them once in a while to give the some moist anyway.
I pour a lot of water. During this time u will see a lot of poo in the bucket. The water makes it a little cleaner and the dirty water runs through the holes in the bottom of the bucket. Keep the bucket outside where the water can run freely. Make sure it´s kept in a shady place also and avoid direct sunlight.
After a few days a lot of the snails starts to move inside their shell and creating a lid of slime hardening in the opening. Nothing to worry about.
After this week it´s time to do some working .
When removing them from the bucket it´s time to clean them up a little before the next step.
Some cold water and a brush and try to remove any dirt and poo that might be stucked on the snail.
When clean and looking good it´s time for the next step.
Killing and slime removal time
Now it´s time for the killing and slime removal process.
For this process u fill a bucket with 2 litres of cold water , 1 dl vinegar and 10 table spoons salt.
Mix it around and u have the deadly mix ready.
Now u drop the snails in it. It will start boiling in the water when the water enters the snails shells and fill them up. This mix will kill the snails pretty quickly. They drop down to the bottom and won´t move at all. The mix will also remove all extra slime from the snails. You will soon see a lot of slime in the water and around the snails. If there is plenty of it u can remove some of the mix and fill up with more liquid. Now you shall let the snails stay in the mix for about 2 hours.
To make sure all slime possible is removed from the snails.
When ready u need to clean the snails again from any slime hanging on to them.
Then its´time for the next step.
Snail removal from the shell
Now it´s time to remove the snail from the shell. But before u do this u need to cook the snails for about 10 minutes. Fill a pot with some cold water . Enough to cover the snails. Then u add the snails.Now the snails should stay there until the water has boild for about 10 minutes.
Then u remove the pot and let the snails cold down a few minutes.
Ready now to remove the snail from the shell. Makes it easy if u have a small fork or a snailfork.
You grab the shell with one of your hands and work with the fork to remove the snail. A gentle twist movement makes it really easy to remove the snail. Don´t use to much force.
The result is a long thing that will curl back and look like a snail with a shell. Fantastic creature for sure. When u have done a few it´s pretty easy and fun to do.
You might think you should eat all that coming out from the shell. That is not correct.
Now it´s time for the next step. That is to remove the big part of the snail u aren´t suppose to eat.
It´s the big shell look a like part of the snail u just removed from the shell. This is the intestinal and the part gripping the shell .The part u should save is the small brownish remaining part. The part u can see when the snail is outside the shell and crawling. This is the only part u should save and eat.
Now u find out that there is only a little left from all the snails with shell u just had.
I had a lot of slime still attached to the snails. I had to have another cleaning process with a small sharp knife removing the slime leftovers. It was slippery and tricky but they ended up clean and nice.
Cooking time
Now the snails shall cook slowly for about 3 hours in a nice bath of goodies.
For this I used:
- Water 2 litres
- White wine 1 litre
- Garlic 6-7 cloves hacked in big chunks
- Parsnip 1 big hacked in big chunks
- Carrot 1 big hacked in big chunks
- Yellow Onion 1 big hacked in big chunks
- One bay leaf
- A handfull with mixed fresh herbs from the garden
- Salt 3 table spoons
- Chilli flakes 1 table spoon ( Optional .Wanted some extra heat )
Now they shall be ready for the final Escargot process .
I freezed the snails in a little bucket when they had cold down.
In the next few weeks from now you should be prepared to see the interesting final result.
Crossing my fingers...
To be continued.......
No comments:
Post a Comment